Thursday 22 May 2014

C# Lazy Initialization or Instantiation

Introduction: 

Sometime we want to defer or delay the initialization of the resource intensive or large object in case if it is not required at the moment to improve the performance or response time of the application.
Microsoft C# 4.0 introduced new feature Lazy<T> to achieve the above behavior. 

Lazy<T> defers or delay the creation of a large or resource-intensive object, or the execution of a resource-intensive task. It creates the instance of the object when it is first time used or called in the application.

Lazy<T> Properties:


It has 2 properties
  • IsValueCreated: It is boolean type property which return true if object is instanciated and false if not.
  • Value: It returns the object of type T.

Now I am going to create one sample application to demonstrate how to use it.

Step 1. Create one C# Console LazyInitialization application.
Step 2. Open the Program file and add below 2 classes inside the same namespace.


  public class Order

    {
       public Order()
      {
         this.OrderId=1234;
         this.DeliveryDate = DateTime.Today;
         this.OrderCreationDate = DateTime.Today.AddDays(-2);
      }

        public int OrderId { get; set; }


        public DateTime DeliveryDate { get; set; }        

        public DateTime OrderCreationDate { get; set; }
    
    }
    public class Customer
    {
        public string FirstName { get; set; }
        public string LastName { get; set; }
        public Lazy<Order> OrderInformation { get; set; }
    }


Customer class has an aggregation with Order. 
Initialization of the Order object will be deferred and it will only get initialized when it will be demanded first time in the application.

Now update the main method as shown below


 static void Main(string[] args)
        {
            Customer customer = new Customer();
            customer.FirstName = "Joe";
            customer.LastName = "Mackenzy";           
            customer.OrderInformation = new Lazy<Order>(); 

            Console.WriteLine("Customer Name:{0}", customer.FirstName + " " + customer.LastName);
            Console.WriteLine("Customer's Order isCreated: {0}", customer.OrderInformation.IsValueCreated);

            var customerOrder = customer.OrderInformation.Value;

            Console.WriteLine("Customer's Order isCreated: {0}", customer.OrderInformation.IsValueCreated);
            Console.WriteLine("Customer's Order ID: {0} Delivery Date: {1}", customerOrder.OrderId, customerOrder.DeliveryDate);
            Console.Read();
        }


it will output as  below


Primitive DataType:

Below I am going to illustrate for int data type.

 static void Main(string[] args)
        {
            int z = 0;
           
            Lazy<int> lazyint = new Lazy<int>(() => { z = 10; return z; });
            Console.WriteLine(string.Format("Value of z: {0}", z));
            var zValue = lazyint.Value;
            Console.WriteLine(string.Format("Value of z: {0}", zValue));
            Console.Read();

        }

In the above program z is an integer type variable with value 0. 
now z is initialized with Lazy object and inside anonymous method value of z is set to 10 which is a parameter of Lazy constructor.

so value of z is set to 10 after referring Value property of lazyint when it is being actually used. 

Output:
Value of z: 0
Value of z: 10.


Note: Refer MSDN for multithread usage.


Saturday 10 May 2014

Managed Extensibility Framework Step by Step

Introduction:

As we know MEF is Microsoft Extensibility Framework. It helps in developing loosely coupled, extensible applications. So it leverage to plug in components in already developed application. I am not going to discuss much about the theoretical discussion rather step by step guide to how to use this framework in a sample application.

MEF works on OPEN-CLOSED Principle of the SOLID principles which is as below

Module should be closed for modification but open for extension.


MEF basic terminology:

1. Catalog : contain components those are to be plugged-in 
2. Exports: These are contracts or plug-in which can be composed in the application
3. Imports: These are properties or socket where components can be plugged-in.
4. Composition: it composes all together.

Application Brief:

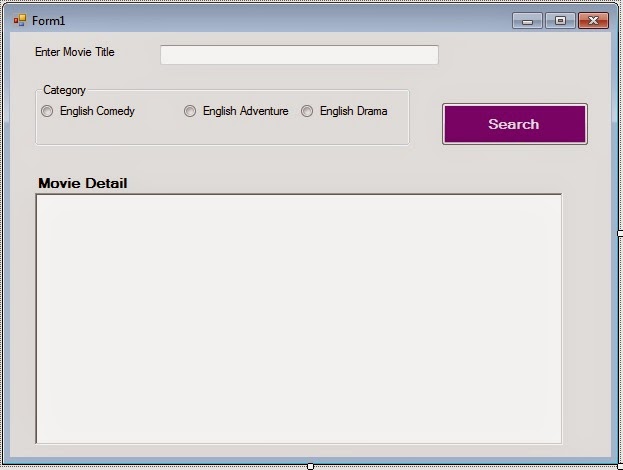
It is a Movie Search Windows Application and Form will have design as shown below. Initially it can search only English Comedy movies and later we will add more components to search the Adventure and Drama movies as well.

Steps:

Step 1. Create a Window Application and named it MovieSearchApplication.


Step 2. Add one label with text property as "Enter movie title" and textbox to enter Title of the movie and radio buttons to select movie categories and richtexbox to display the movie details as shown below. Add one button and enter text property as Search.


Step 3.  Add one Class Library project and named it MovieDetailContract.

Step 4. Delete class1.cs file and another class file and named it as IMovie.cs and paste the below content.

Open the IMovie.cs file and add one Interface IMovie

 public interface IMovie
    {
        IList<Movie> GetMovies(string movieTitle); 
    }

and a class Movie as below
    public class Movie
    {
        public string MovieID { get; set; }
        public string Title { get; set; }
        public string Director { get; set; }
        public DateTime ReleaseDate { get; set; }
        public double Price { get; set; }           
   
    }

step 5. Compile the project and add its reference in MovieApplication Project.

step 6. Add another project class library project and named it as ComedyMovieComponent in the solution.
step 7. Add EnglishComedy.cs file and delete class1.cs file

Step 8. Add reference of MovieDetailContract assembly.

step 9. Add reference of System.Component.Composition assembly.

Step 10. Open EnglishComedy.cs file and type as below


using System;
using System.Collections.Generic;
using System.ComponentModel.Composition;
using System.Linq;
using System.Text;
using System.Threading.Tasks;
using MovieDetailContract;
namespace ComedyMovieComponent
{
    [Export(typeof(IMovie))]
    [ExportMetadata("MovieCategory", "EnglishComedy")]
    public class EnglishComedy : IMovie
    {
       private ICollection<Movie> MovieList()
        {
            List<Movie> movies = new List<Movie>();
            Movie comedymovie = new Movie() { MovieID = "CM1001", Title = "Sister Act", Price = 450.00 };
            movies.Add(comedymovie);
            comedymovie = new Movie() { MovieID = "CM1011", Title = "Brazil", Price = 250.00 };
            movies.Add(comedymovie);
            comedymovie = new Movie() { MovieID = "CM1010", Title = "Midnight Run", Price = 150.00 };
            movies.Add(comedymovie);
            comedymovie = new Movie() { MovieID = "CM1101", Title = "Galaxy Quest", Price = 550.00 };
            movies.Add(comedymovie);
            comedymovie = new Movie() { MovieID = "CM1401", Title = "A Fish called Wanda", Price = 450.00 };
            movies.Add(comedymovie);
            return movies;
        }

        public IList<Movie> GetMovies(string movieTitle)
        {
           
            List<Movie> movies = MovieList() as List<Movie>;
            var searchedmovies = movies.Where(m => m.Title.Contains(movieTitle)) ;
            List<Movie> movieList = searchedmovies.ToList<Movie>();
           return movieList;
        }
    }
}


You can see EnglishComedy class is decorated with Export attribute which help to plug the component in the MovieApplication socket while ExportMetadata attribute will help to dynamically finding the required component and using it for expected operation.

Step 11. Add a folder Components in the MovieApplication.


Step 12. Copy ComedyMovieComponent assembly in Components folder.

Step 13. Open Form1.cs file and add below code

 [ImportMany] 
private Lazy<IMovie, IDictionary<string, object>>[] movies { get; set; }

//This is the socket in the application where plug-in ComedyMovieComponent will fit-in. 

private CompositionContainer _container;

Step 14. Add below method to create the catalog of the components. 

 private void InitializeParts()
        {
            var catalog = new AggregateCatalog();
            catalog.Catalogs.Add(new   DirectoryCatalog(@"D:\MEF\Mobile\MovieApplication\Components"));
            _container = new CompositionContainer(catalog);
            this._container.ComposeParts(this);

        }
reference this method in form1 constructor as below

 public Form1()        
{            
     InitializeComponent ();            
     InitializeParts();        
}

Step 15. Now add below on click event of Search button 

private void button1_Click(object sender, EventArgs e)        
{          

 RadioButton categorybutton =  groupBox1.Controls.OfType<RadioButton>().FirstOrDefault(r => r.Checked);
          string movieCategory = categorybutton.Text.Trim().Replace(" ", "").ToUpper();   
          string title = textBox1.Text.Trim();
          bool isMovieFound = false;
          foreach (Lazy<IMovie, IDictionary<string, object>> movie in movies)
          {
              string componentMovieCategory = movie.Metadata["MovieCategory"].ToString().ToUpper();
              if (componentMovieCategory == movieCategory)
              {
                  
                  List<Movie> searchedMovies = movie.Value.GetMovies(title).ToList();
                  StringBuilder movieString = new StringBuilder();
                  if (searchedMovies != null && searchedMovies.Count > 0)
                  {
                      isMovieFound = true;
                      foreach (var searchedMovie in searchedMovies)
                      {
                          movieString.AppendFormat("MovieID: {0}", searchedMovie.MovieID);
                          movieString.AppendFormat("{1}Movie Title: {0}{1} Movie Price: {2}", searchedMovie.Title, Environment.NewLine, searchedMovie.Price);
                          movieString.AppendFormat("{0}====================================={0}",Environment.NewLine);


                      }

                  }
                  richTextBox1.Text = movieString.ToString();
              }
             
          }
          if (!isMovieFound)
          {
              MessageBox.Show("Movie / Category is not available");
          }

}

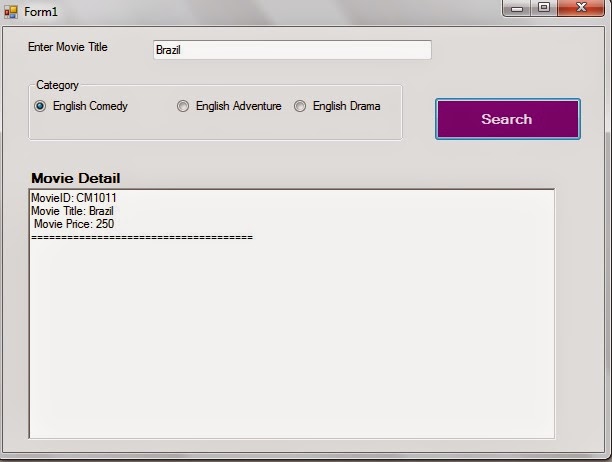
Now run the application
1. Enter movie title as Braz
2. Select English Comedy radio button 
3. Click on the search button

output will come like belowAs


Now select English Adventure category and click on the Search button
Selected Movie/Category is not available message will prompt you.


English Adventure Component Development:


Now we will create English Adventure movies component and will add this to components directory of UI and this will start working.

Step 1. Add another class Library EnglishAdventureComponent in the solution
Step 2. Delete class1.cs and add EnglishAdventure class.
Step 3. Add reference of MovieDetailContract assembly.
Step 4. Add reference of System.Component.Composition assembly.
Step 5. Open the EnglishAdventure class file and add below code

using System;
using System.Collections.Generic;
using System.ComponentModel.Composition;
using System.Linq;
using System.Text;
using System.Threading.Tasks;
using MovieDetailContract;

namespace EnglishAdventureComponent
{
    [Export(typeof(IMovie))]
    [ExportMetadata("MovieCategory", "EnglishAdventure")]
    public class EnglishAdventure:IMovie
    {

        private ICollection<Movie> MovieList()
        {
            List<Movie> movies = new List<Movie>();

            Movie comedymovie = new Movie() { MovieID = "CM1001", Title = "SpiderMan 2", Price = 450.00 };
            movies.Add(comedymovie);
            comedymovie = new Movie() { MovieID = "CM1011", Title = "SpiderMan", Price = 250.00 };
            movies.Add(comedymovie);
            comedymovie = new Movie() { MovieID = "CM1010", Title = "XMan", Price = 150.00 };
            movies.Add(comedymovie);
            comedymovie = new Movie() { MovieID = "CM1101", Title = "Avatar", Price = 550.00 };
            movies.Add(comedymovie);
            comedymovie = new Movie() { MovieID = "CM1401", Title = "Star Wars 1", Price = 450.00 };
            movies.Add(comedymovie);


            return movies;


        }

        public IList<Movie> GetMovies(string movieTitle)
        {

            List<Movie> movies = MovieList() as List<Movie>;
            var searchedmovies = movies.Where(m => m.Title.Contains(movieTitle));
            List<Movie> movieList = searchedmovies.ToList<Movie>();

            return movieList;
        }
    }

}

Step 6. Compile the project and copy the assembly from debug / bin directory and paste in the components folder of the MovieApplication.

Now I am leaving the implementation of English Drama component for you. Please email me in case of issues.

Monday 14 April 2014

Asp.Net MVC 4.0 multiple images or files upload application

In  my previous article I have written step by step how to upload image or file. But only one image / file only can be uploaded at one time.

Here I am going to illustrate with sample application how to upload multiple images or files.

Step 1. Add one model class FileUpload as shown below

 public class FileUpload
    {
        public string FileName { get; set; }
        public string Location { get; set; }
        public HttpPostedFileBase File{ get; set; }

    }

Step 2. Add one controller FileUploadController with read write option.

[HttpPost]
        public ActionResult Create(FormCollection collection)
        {
            HttpFileCollectionBase files = HttpContext.Request.Files;
            int fileCount = files.Count;
            try
            {
                for (int index = 0; index < fileCount; index++)
                {
                  HttpPostedFileBase file =   files.Get(index);
                  file.SaveAs("D:\\Test" + file.FileName.Substring(file.FileName.LastIndexOf("\\"),(file.FileName.Length-file.FileName.LastIndexOf("\\"))));
                }
                return RedirectToAction("Index");
            }
            catch(Exception ex)
            {
                return View(ex.Message);
            }
        }


Step 3.  Add view to the Create Get method in controller by right click and select add view. Select strongly type view and select or type complete path of model FileUpload class. Type the below code in view 


@using (Html.BeginForm("Create", "FileUpload", FormMethod.Post, new  { enctype="multipart/form-data"}))
{
        <div class="editor-field">
                @Html.TextBoxFor(model => model.File, new { type = "file", Multiple = "Multiple" })
               
        </div>
         <div class="editor-field">
                @Html.TextBoxFor(model => model.File, new { type = "file", Multiple = "Multiple" })
               
        </div>
     <div class="editor-field">
                @Html.TextBoxFor(model => model.File, new { type = "file", Multiple = "Multiple" })
               
        </div>
        <p>
            <input type="submit" value="Create" />
        </p>
}

Step 4. Create D:\\Test folder.Give permission and remove read only attribute.

Now run and select and save the files.

Saturday 12 April 2014

CoVariance and ContraVariance in CSharp

I am going to discuss about the Variance in csharp. But before that we have to know about some keyword

Subtyping: is a polymorphism rule in programming language which refers to how 2 complex types A (subtype or more specific type) can substitute or can be used where B(super type or generic type) is required.

Variance: refers to how subtyping between components of A and B are related depending on the subtyping relations between A and B.

Covariant: A is subtype of B. Then A can be used where B is required.
Contravariant: Reverse of above.
Bivariant: Both covariant and contravariant is applicable.
Invariant: None of the above


In this content I am going to discuss how Delegates uses co- and contraVariant.

Contravariant Delegates Arguments:

FamilyCar <: Car (FamilyCar is a derived class of Car.)

In the below example delegate CardetailDelegate expects an argument of type FamilyCar but it is assigned to a method with base class argument Car.


using System;
using System.Collections.Generic;
using System.Linq;
using System.Text;
using System.Threading.Tasks;

namespace Variance
{
    class Program
    {
        delegate string CardetailDelegate(FamilyCar car);
        static void Main(string[] args)
        {
            FamilyCar fmCar = new FamilyCar();
            fmCar.EnginePower = "80";
            fmCar.EngineDisplacement = "1300";
            fmCar.Color = "RED";
            fmCar.Length = 4;
            fmCar.Price = 350000;
            fmCar.SeatingCapacity = 5;         

            CardetailDelegate cardetaildel = CarDetail; //delegate is assigned to a method with base class argument Car

            Console.WriteLine(cardetaildel(fmCar));
            Console.Read();
        }
        static string CarDetail(Car car)
        {
      
            return string.Format("I am a car with {0} BHP power and {1} cc displacement. I am {2} mt in length and {3} in color. {4} passengers can sit together.", car.EnginePower,

car.EngineDisplacement, car.Length, car.Color, car.SeatingCapacity);
       
   
        }
    }
}

public  class Car
{
    public string Color { get; set; }
    public virtual string EnginePower { get; set; }
    public virtual string EngineDisplacement { get; set; }
    public virtual int SeatingCapacity { get; set; }
    public  int Length { get; set; }
    public bool AC { get; set; }
    public decimal Price { get; set; }


}


public class FamilyCar : Car
{
    string enginePower;
    string engineDisplacement;
     int seatingCapacity;

    public override string EnginePower
    {
        get
        {
            return enginePower;
        }
        set
        {
            enginePower = value;
        }
    }

    public override string EngineDisplacement
    {
        get
        {
            return engineDisplacement;
        }
        set
        {
            engineDisplacement = value;
        }
    }

    public override int SeatingCapacity
    {
        get
        {
            return seatingCapacity;
        }
        set
        {
            seatingCapacity = value;
        }
    }

   
}


CoVariance delegates return type:

In the below example delegate NewCarDelegate returns type Car but it is assigned to a method with derived class return type FamilyCar.


using System;
using System.Collections.Generic;
using System.Linq;
using System.Text;
using System.Threading.Tasks;

namespace Variance
{
    class Program
    {
       
       
        delegate Car NewCarDelegate();


        static void Main(string[] args)
        {


            NewCarDelegate newCar = GetNewCar; //contravariance GetNewCar return FamilyCar but NewCarDelegate has return type Car which base class of FamilyCar
           
            Console.WriteLine(CarDetail(newCar()));

            Console.Read();
        }
        static string CarDetail(Car car)
        {       
            return string.Format("I am a car with {0} BHP power and {1} cc displacement. I am {2} mt in length and {3} in color. {4} passengers can sit together.", car.EnginePower,

car.EngineDisplacement, car.Length, car.Color, car.SeatingCapacity);       
   
        }

        static FamilyCar GetNewCar()
        {
            FamilyCar fmCar = new FamilyCar();
            fmCar.EnginePower = "180";
            fmCar.EngineDisplacement = "3000";
            fmCar.Color = "White";
            fmCar.Length = 6;
            fmCar.Price = 1500000;
            fmCar.SeatingCapacity = 5;
            return fmCar;
        }
    }
}

public  class Car
{
    public string Color { get; set; }
    public virtual string EnginePower { get; set; }
    public virtual string EngineDisplacement { get; set; }
    public virtual int SeatingCapacity { get; set; }
    public  int Length { get; set; }
    public bool AC { get; set; }
    public decimal Price { get; set; }


}


public class FamilyCar : Car
{
    string enginePower;
    string engineDisplacement;
     int seatingCapacity;

    public override string EnginePower
    {
        get
        {
            return enginePower;
        }
        set
        {
            enginePower = value;
        }
    }

    public override string EngineDisplacement
    {
        get
        {
            return engineDisplacement;
        }
        set
        {
            engineDisplacement = value;
        }
    }

    public override int SeatingCapacity
    {
        get
        {
            return seatingCapacity;
        }
        set
        {
            seatingCapacity = value;
        }
    }   
}


We will discuss more on this in coming blogs.

Tuesday 8 April 2014

ASP.Net MVC 4 Image Upload Application Step by Step

I am going to develop an image upload application step by step in Asp.Net MVC 4.0. It is sometimes required to upload image in application.

It is sample application and you can upload one image against an employee.

Step 1.  Open Visual Studio and click on the File à New Project. Select ASP.Net MVC 4.0 Web application as shown below.

Step 2.  Give the project name as ImageUploadProject.
Step 3. Select Internet Application template as shown below and click on the OK button.

Step 4.  Run the application you will see the below screen in the browser.


Step 6.  In the SQL Server create Database EmployeeDB and table Employee as shown below.
               
CREATE TABLE [dbo].[Employee](
      [EmployeeID] [int] IDENTITY(1,1) NOT NULL,
      [FirstName] [nvarchar](50) NOT NULL,
      [LastName] [nvarchar](50) NOT NULL,
      [Address] [nvarchar](50) NULL,
      [ZipCode] [nvarchar](50) NULL,
 CONSTRAINT [PK_Employee] PRIMARY KEY CLUSTERED
(
      [EmployeeID] ASC
)WITH (PAD_INDEX  = OFF, STATISTICS_NORECOMPUTE  = OFF, IGNORE_DUP_KEY = OFF, ALLOW_ROW_LOCKS  = ON, ALLOW_PAGE_LOCKS  = ON) ON [PRIMARY]
) ON [PRIMARY]

GO


Step 7. Browse the solution and locate Model folder. Add Employee class as shown below


public class Employee    {
        public int EmployeeID { get; set; }
        [Required]
        [StringLength(50)]
        public string FirstName { get; set; }
        [Required]
        [StringLength(50)]
        public string LastName { get; set; }
        public string Address { get; set; }
        public string ZipCode { get; set; }
        [NotMapped]
        public HttpPostedFileBase Image { get; set; }
        [NotMapped]
        [Display(Name = "Image")]
        public string ImageFile { get; set; }
    }


Step 8.  Add EmployeeDBContext class in the Model folder as shown below

public class EmployeeDBContext:DbContext
    {
        public DbSet<Employee> EmployeeCollection { get; set; }

        public EmployeeDBContext()
            : base("EmployeeConnection") {        }
        protected override void OnModelCreating(DbModelBuilder modelBuilder)
        {
            modelBuilder.Entity<Employee>().Map(m =>
            {
                m.MapInheritedProperties();
                m.ToTable("Employee");

            })          
            .Property(m => m.EmployeeID).HasColumnName("EmployeeID").HasDatabaseGeneratedOption(DatabaseGeneratedOption.Identity).IsRequired();
        }      
    }

Step 9. Add Employee Controller as shown below


Step 10. : Add the  below methods in the Employee Controller.
         public ActionResult Create()
        {
            return View();
        }

        //
        // POST: /Employee/Create

        [HttpPost]
        [ValidateAntiForgeryToken]
        public ActionResult Create(Employee empModel)
        {
            try
            {
             using (EmployeeDBContext edb = new EmployeeDBContext())
                {
                    edb.EmployeeCollection.Add(empModel);
                    edb.SaveChanges();
                    PictureUpload(empModel);
                }

                return RedirectToAction("Index");
            }
            catch(Exception ex)
            {
                return View();
            }
        }

Step 11. Right click on the Create method and select Add View method.


Step 12. Add the below tag to upload image in case if not auto generated in create.cshtml file.
<div class="editor-field">
                @Html.TextBoxFor(model => model.Image, new { type = "file" })
                @Html.ValidationMessageFor(model => model.Image)
        </div>
Step 12.  Add below 2 methods in the EmployeeController class
private void PictureUpload(Employee emp)
        {
            if (emp.Image.ContentLength > 0)
            {
               
                var filePath = Server.MapPath(@"/Content/Uploads");
                string savedFileName = Path.Combine(filePath, emp.EmployeeID.ToString()+".jpg");
                emp.Image.SaveAs(savedFileName);
               
            }
           
        }
        private void DownloadPetPicture(IList<Employee> empList)
        {
            foreach (var employee in empList)
            {
                var name = "/Content/Uploads/"+employee.EmployeeID.ToString() +".jpg";
                var picture = @UrlHelper.GenerateContentUrl( name,  this.HttpContext);
               
                employee.ImageFile = "<img src='" + picture + "'></img>";
            }
        }
Step 13. Update the Index method as shown below
public ActionResult Index()
        {
            List<Employee> employeeCollection = null;
            using (EmployeeDBContext emd = new EmployeeDBContext())
            {
              
                 employeeCollection =   emd.EmployeeCollection.ToList();
                 if (employeeCollection != null)
                     DownloadPetPicture(employeeCollection);
            }
            return View(employeeCollection);
        }
Step 14. Create one Uploads folder under Content folder in the solution. 
We can write code to auto generate the folder in case it is not available. But I have not coded that. Add strongly view with index method as shown in previous steps. 
Now build and type Employee/create you will see the below screen


Enter values and select image it will take you the index(or List) view as shown below